
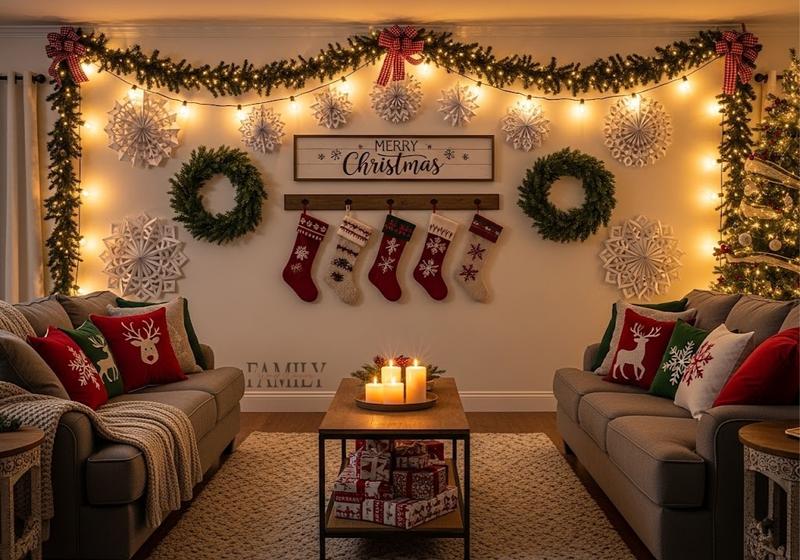
Want to make your home feel festive without spending a fortune on store-bought decor?
These 30 homemade Christmas wall decor ideas are quick to craft, budget-friendly, and full of personality. You’ll find rustic wood signs, Scandinavian-inspired wreaths, family-friendly photo projects, and even upcycled materials that turn everyday items into holiday showpieces.
Imagine walking into a room where a glowing DIY pallet tree sets the mood, family photos are strung on twinkling lights, and a handmade advent calendar brings daily excitement. These aren’t generic store displays—they’re pieces you created, with your style and your memories at the center.
If you want ready-made accents to complement your crafts, explore our Christmas Wall Decor Collection—perfect for mixing with homemade touches.
If you love the warmth of farmhouse living and the charm of natural textures, these rustic-inspired wall decor ideas will make your space feel like a holiday retreat. Think reclaimed wood, organic greenery, and vintage finds—all adding cozy character without feeling overdone. These crafts bring the outdoors inside and work beautifully in living rooms, entryways, or even kitchens.
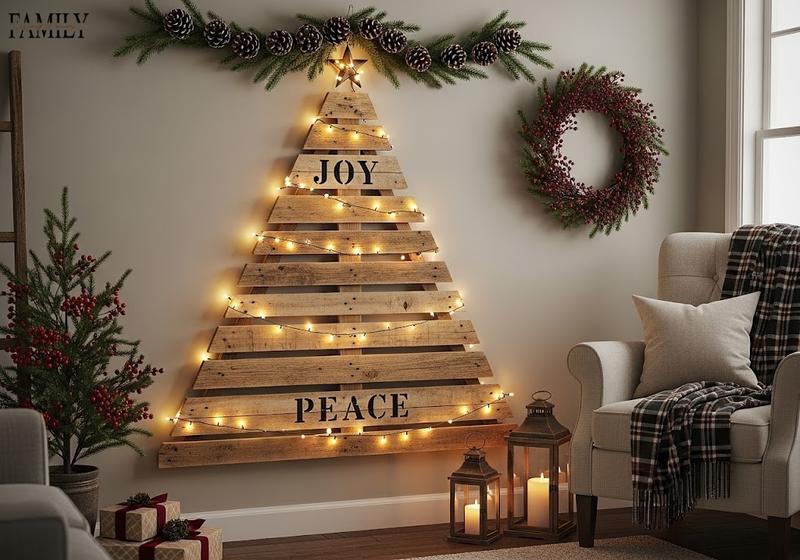
Last year, I created a pallet tree using scrap wood from an old project, and it instantly became a conversation piece in my living room. Cut the wood into descending lengths to form a tree shape, then stencil simple holiday words like “Joy” or “Peace”. A soft string of LED lights draped across the slats gives it a cozy evening glow.
Tip: If time is tight, the Santa Metal Wall Art gives the same rustic charm—no hammer required.
One December afternoon, my kids and I collected pine cones from our backyard and paired them with cedar clippings. We strung them on jute twine and hung the garland above the sofa—our whole living room smelled like a forest.
Tip: Lightly spray a few cones with metallic gold paint or faux snow for sparkle, and use removable hooks for easy installation after the season.
This was one of my first DIY holiday signs, and it came together in under an hour. Stretch burlap over a simple wooden frame, stencil your favorite Christmas message, and finish with sprigs of greenery at the corners.
Tip: Use matte white or gold paint for lettering—it pops against burlap without looking too shiny. Hang it as a standalone piece or layer it within a gallery wall of holiday photos.
When I found an old sled at a flea market, I couldn’t resist turning it into wall decor. I tied a wide plaid ribbon around the middle, tucked in some evergreen branches, and hung it vertically by our entryway. Guests still comment on how welcoming it feels.
Tip: If you don’t have an old sled, craft stores sell small decorative ones perfect for the same effect. Pair it with a mini wreath for extra dimension.
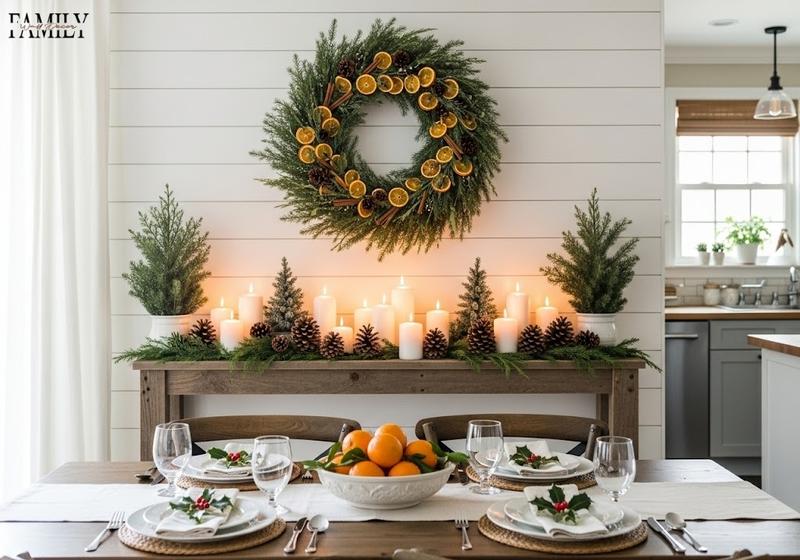
I started drying orange slices years ago because I love the subtle scent they release. Paired with cinnamon sticks and a simple greenery wreath, the result is both rustic and aromatic.
Tip: Use a dehydrator or low oven heat to prevent burning the oranges. Hang the wreath above the mantel or near your dining area to give your whole space a cozy, farmhouse scent.
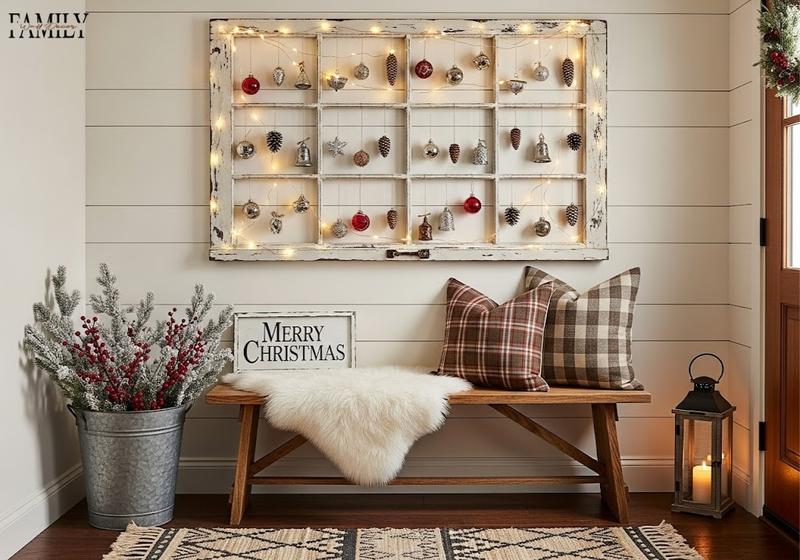
A friend gave me an old window frame, and it became one of my favorite holiday DIYs. After sanding and lightly distressing it, I wove warm fairy lights around the edges and hung tiny ornaments in each pane. At night, it glows like a window to a winter wonderland.
Tip: Secure lights with small clear clips or hot glue for a neat look, and use lightweight ornaments to avoid pulling on the frame.
Minimalist and Scandinavian holiday decor focuses on clean lines, neutral colors, and natural materials. It’s perfect for anyone who loves a calm, uncluttered look with subtle festive touches. These ideas are quick to assemble, easy to customize, and bring a sense of quiet elegance to your home.
One of my favorite quick holiday projects was making a trio of wreaths using simple embroidery hoops and faux eucalyptus. I hung them at staggered heights on a blank wall, and they instantly gave my space that cozy Nordic feel without overwhelming the room.
Tip: Stick to whites, soft grays, and muted greens for a true Scandinavian vibe. If you want a ready-made accent to mix in, browse our Christmas wall decor collection for neutral-toned pieces.
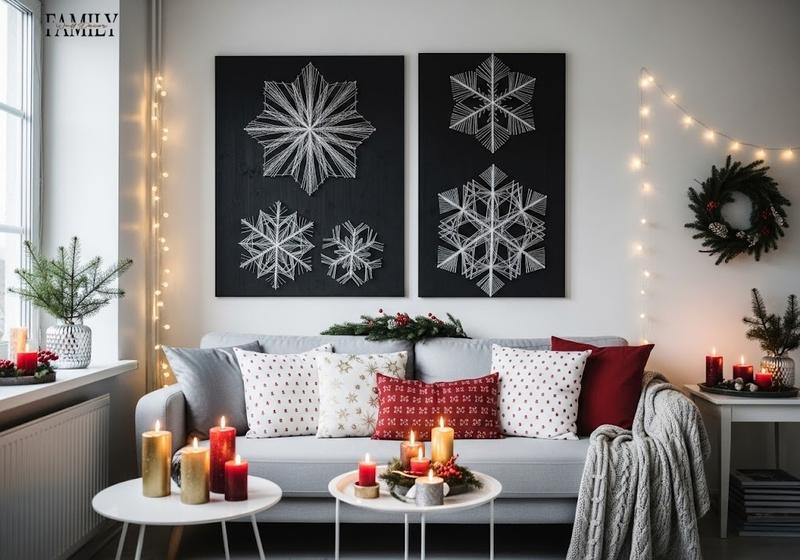
I tried this project last winter, and it turned out surprisingly striking for how little it cost. Using nails on painted wood boards and white thread, I made a series of geometric snowflake patterns. They became an instant conversation piece and looked like boutique art.
Tip: Choose high-contrast backgrounds like matte black or deep gray to make the white thread stand out.
One of the easiest ways I’ve refreshed a space was by printing holiday quotes in clean, Scandinavian fonts and framing them in slim black frames. It’s budget-friendly, takes minutes, and you can swap out prints every season.
Tip: Hang three or five prints in a row for a gallery effect. You can also mix in family photos displayed with clipboards or wire grids for a personal touch.
I made a cluster of white and metallic paper stars one snowy afternoon, and the result looked like something out of a design magazine. It’s lightweight, inexpensive, and works especially well in dining rooms or entryways.
Tip: Fold stars in varying sizes and use removable adhesive tabs so you can easily reposition or remove them after the holidays.
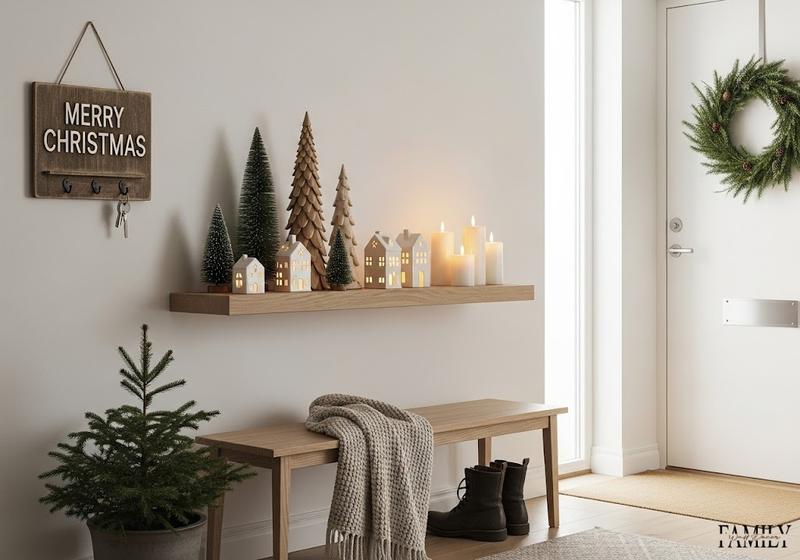
I love styling one slim floating shelf with miniature trees, candles, and ceramic houses. It’s minimal yet warm, like a small curated holiday vignette.
Tip: Use battery-operated candles to keep things safe and mess-free. Pair your DIY setup with a personalized piece like the Winter Wonderland Key Holder for a functional, festive touch.
I once tied a bare branch with white bells using jute twine and hung it above our console table—it instantly became one of the most complimented pieces in our home that year. It’s rustic yet refined and takes only minutes to make.
Tip: For extra holiday spirit, add a sprig of eucalyptus or a tiny string of fairy lights.
Crafting together as a family is one of the best ways to make holiday memories. These ideas are simple enough for kids to help with and meaningful enough to display all season long—and even keep as keepsakes for years to come.
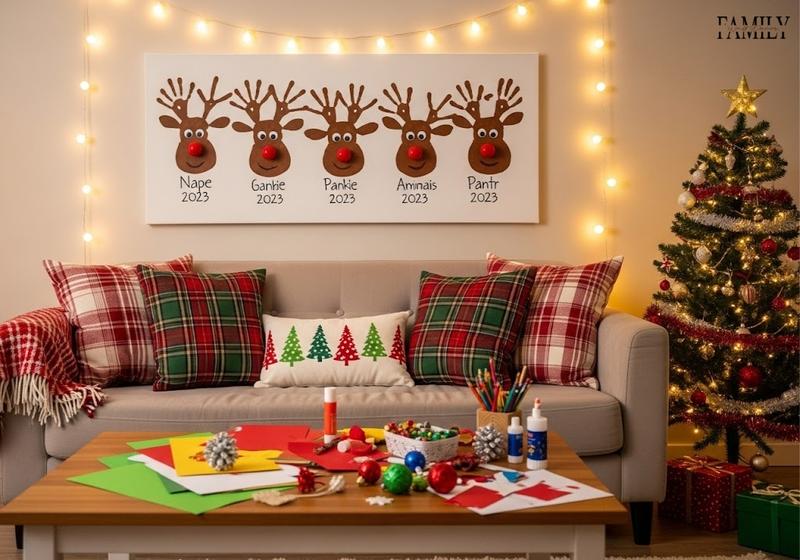
One of the sweetest crafts I’ve ever done with my kids was turning their handprints into reindeer antlers. We dipped their hands in non-toxic brown paint, pressed them onto canvas, and added googly eyes and red noses. The kids were so proud to see their artwork hanging in the living room, and I love pulling it out year after year.
Tip: Use canvas boards instead of paper—they last longer and are easier to hang. Consider adding the child’s name and year in small print at the bottom to make it a keepsake.
Last year, we skipped the big tree for a small apartment and made a photo collage Christmas tree on the wall instead. We printed out our favorite family pictures, arranged them into a triangle shape like a tree, and topped it with a shiny paper star. The result was incredibly personal and became a conversation starter for every guest who visited.
Tip: Use removable adhesive strips so photos don’t damage walls. If you love showcasing family memories all year long, consider our Family Timeline Wall Decor for a permanent display solution.
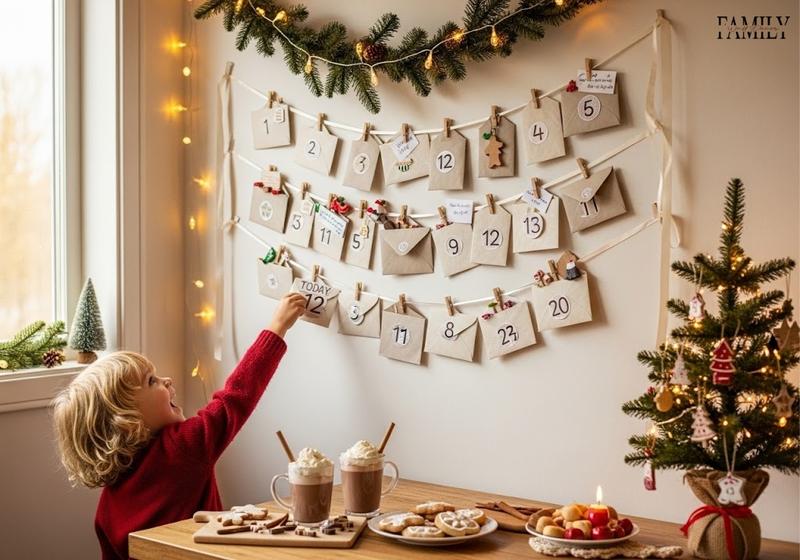
A few years ago, I made an advent calendar using mini envelopes clipped to a ribbon, and it became a favorite tradition. Each envelope held little surprises—chocolates, tiny toys, or sweet handwritten notes—and my kids raced to check their pockets each morning. It created daily excitement and made the countdown to Christmas even more memorable.
Tip: Use neutral-colored envelopes or fabric pouches for a clean look, and number them with stickers or stamps. Hang it near the kitchen or living room so everyone can easily reach it.
This craft is perfect for a cozy afternoon with kids because it’s simple, safe, and colorful. We cut felt into basic shapes like trees, stars, and candy canes, then strung them together on a long piece of yarn. Hanging the finished banner across our mantle brought instant cheer to the space and gave the kids a sense of pride in their handiwork.
Tip: Choose stiff felt—it holds its shape better—and use a needle with a big eye or hot glue for quicker assembly.
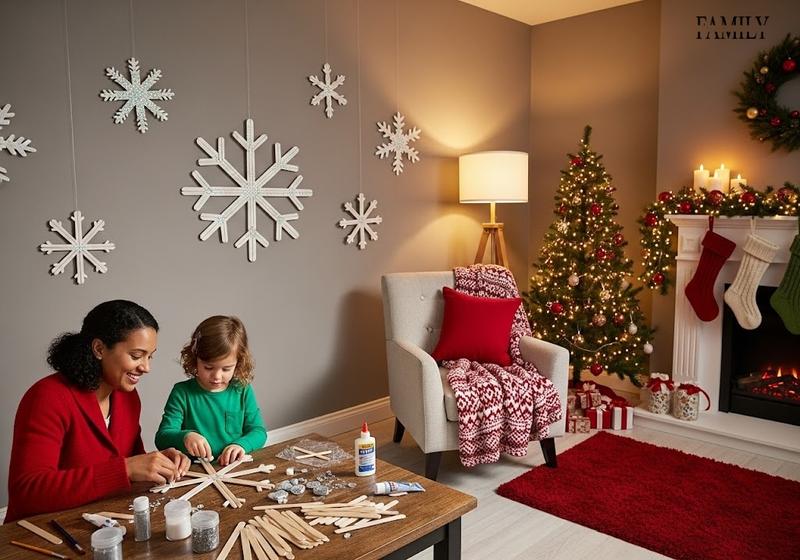
One snowy afternoon, we turned popsicle sticks into oversized snowflakes, painted them white, and sprinkled them with glitter for sparkle. Hanging them with clear fishing line made them appear to float on the wall—a magical effect that impressed visiting family.
Tip: Use wood glue for strong holds and spray paint for an even finish. Group multiple snowflakes together at different heights for a gallery-style display.
One of my favorite personalized crafts was painting our family’s initial on a wooden plaque, then decorating it with faux holly and berries. It felt uniquely ours and made the perfect centerpiece above our entryway table.
Tip: Use metallic paints or glitter accents for a festive finish. If you want something ready-made and customized, our Personalized Winter Wonderland Key Holder is both functional and decorative.
Decorating for the holidays doesn’t have to be expensive. Some of the most charming wall decor pieces come from items you already have at home or can pick up secondhand for next to nothing. These upcycled ideas are wallet-friendly, eco-conscious, and full of character.
One year, I had a stack of spare mason jar lids and decided to spray-paint them gold and silver. I arranged them in a tidy grid on the wall and tied on little ribbons—it looked like a wall of shimmering ornaments. Guests were shocked when I told them it cost less than $10.
Tip: Use a template to keep spacing even, and try mixing matte and metallic finishes for depth.
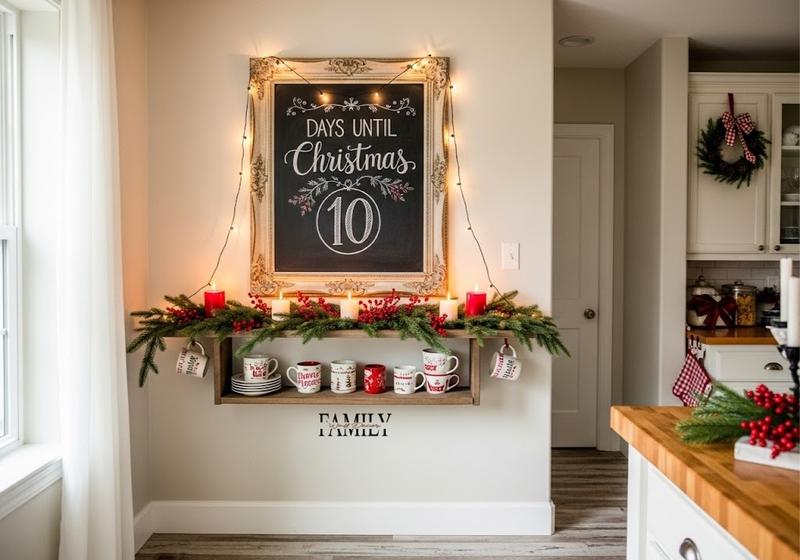
I picked up an old frame from a thrift store, painted the insert with chalkboard paint, and suddenly had a customizable holiday wall feature. We use it every year to count down to Christmas and write fun holiday messages.
Tip: If the frame is ornate, paint it white or red for a festive twist. Chalk markers work best—they don’t smudge as easily as traditional chalk.
On a snowy afternoon, my kids and I cut out oversized paper snowflakes and arranged them in a cascading pattern down our stairway wall. The result felt whimsical and bright, like we were walking through a winter wonderland.
Tip: Use thicker paper or cardstock so the snowflakes hold their shape, and tape them with removable adhesive strips to avoid wall damage.
When I needed quick holiday decor on a budget, I framed pieces of leftover wrapping paper in thrifted frames. It instantly created a cheerful gallery wall, and I could swap designs every year.
Tip: Choose three to five patterns in the same color family for a cohesive look. Metallic or foil wrapping paper really pops under soft lighting.
After cleaning out my closet, I used old sweaters to create mini decorative stockings. They had a soft, homey vibe and looked adorable hanging in a row on our entryway wall.
Tip: Add little name tags or patches for personalization. If sewing isn’t your thing, fabric glue works surprisingly well.
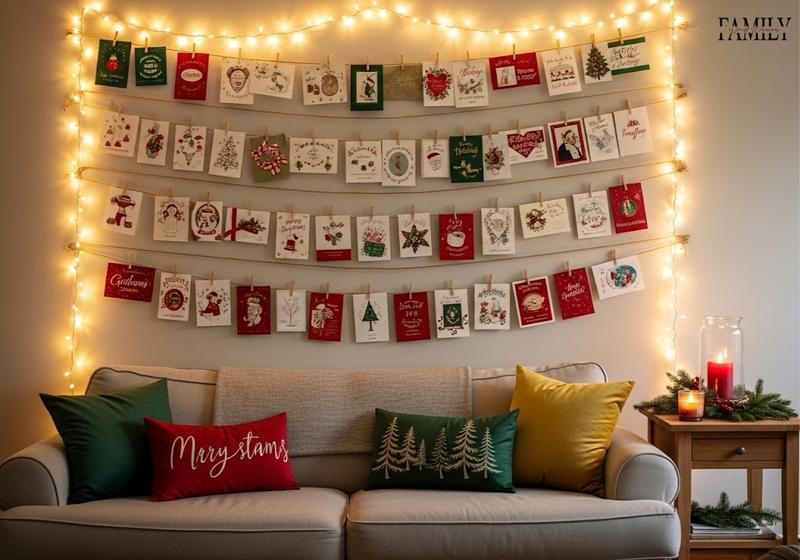
One of the easiest and most meaningful displays I’ve done is hanging holiday cards from family and friends on twine with mini clothespins. It’s nostalgic, personal, and changes throughout the season as new cards arrive.
Tip: Use two or three rows of twine to fill a larger wall and create a layered look. Save your favorite cards each year to start a tradition—after a few years, you’ll have a mini gallery of memories.
Personalized decor brings warmth and meaning to your holiday home. These ideas go beyond generic decorations and celebrate the people and moments that make this season special.
Last year, I wrapped our family initial in greenery and faux red berries, and it instantly became the centerpiece of our holiday gallery wall. It felt uniquely ours and doubled as a year-round statement piece after Christmas.
Tip: Use lightweight wooden or MDF letters for easier hanging. For a cozy farmhouse vibe, wrap part of the letter in chunky yarn before adding greenery.
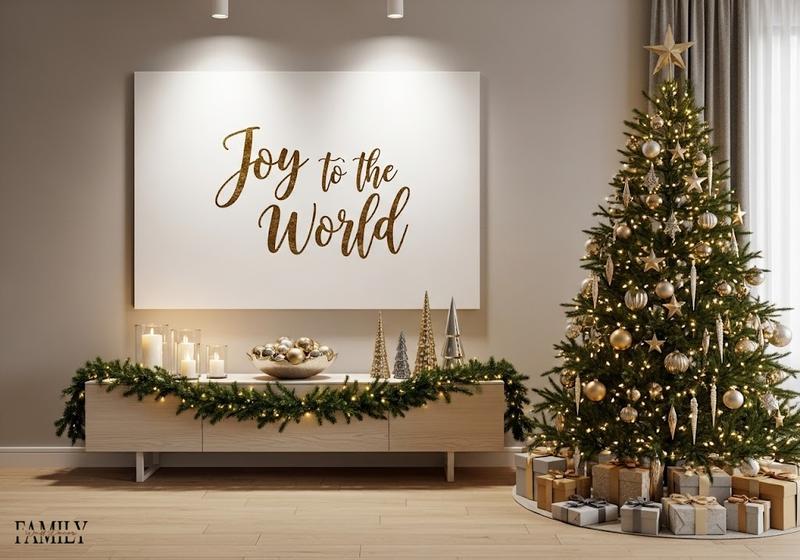
I once stenciled “Joy to the World” in metallic gold paint on a white canvas, and it’s still one of my favorite holiday accents. It shines in photos, looks professional, and cost just a fraction of a store-bought version.
Tip: Use painter’s tape to keep lines clean, and add a subtle glitter spray over the lettering for extra sparkle. This piece works beautifully above a console table or as part of a festive gallery wall.
One of the most meaningful displays I’ve made was a photo wall framed by warm string lights. I clipped photos from past Christmas mornings and family trips, and at night it glowed with a cozy, nostalgic warmth. Guests always lingered there, pointing out their favorite memories.
Tip: Use clear clips to attach photos for a clean look and choose warm white lights for a soft, flattering glow.
For couples or newlyweds, it’s the perfect spot to showcase your milestones—browse our First Christmas Together Collection for keepsakes that complement this idea beautifully.
One winter break, I stitched our family name and a small holly sprig onto linen in an embroidery hoop, and it’s now one of our most treasured heirloom decorations. It’s quiet work—something to enjoy on a snowy afternoon—and it creates a piece you’ll want to hang every year.
Tip: If you’re new to embroidery, start with a simple holiday saying like “Peace” or “Noel.” Use metallic thread for sparkle and hang multiple hoops at different heights for a layered effect.
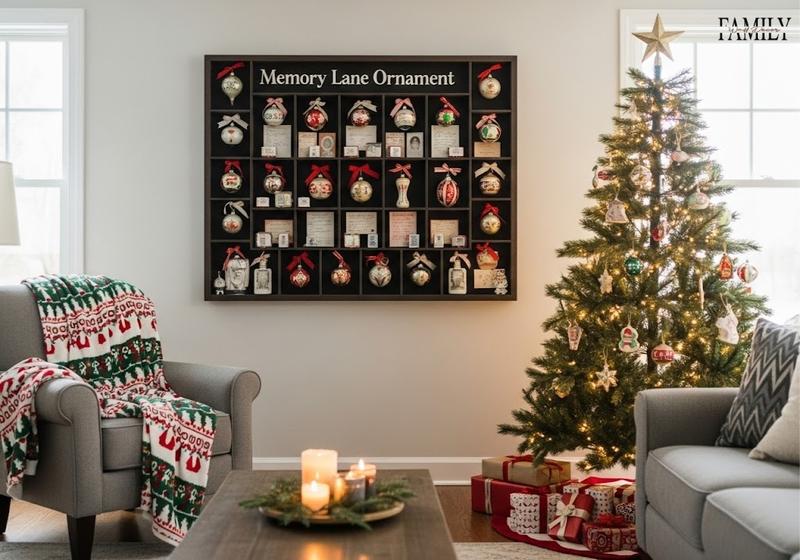
I once gathered heirloom ornaments that belonged to my grandmother and placed them in a shadow box, along with a small note about their history. It instantly became the most talked-about wall piece that year because it told a story, not just decorated a space.
Tip: Use acid-free backing paper to preserve delicate items and label each ornament with the year or family member it came from. Hang it near your main tree for a thoughtful, sentimental touch.
This idea became a hit with our kids. We painted a scrap wood board with chalk paint, added a festive border, and wrote numbers each morning as we counted down to Christmas. The kids loved updating it and it kept the holiday excitement alive every day.
Tip: Use a magnetic board underneath the chalk paint so you can attach small holiday magnets as markers, or add a ribbon and bell to make it interactive and fun.
Start with projects that require minimal tools and no special skills. Simple paper crafts, framed wrapping paper, or a basic painted canvas can be completed in under an hour. These quick wins add a festive touch without feeling overwhelming—perfect for busy schedules or first-time crafters.
Think upcycling and layering. Use items you already have—like old frames, fabric scraps, or leftover holiday ribbons—and turn them into creative wall accents. Then, mix in one or two statement pieces from our Christmas Wall Decor Collection to pull everything together. The combination looks intentional and chic without straining your budget.
Natural and reusable elements are your best bet. Pine cones, dried citrus, reclaimed wood, and greenery add organic texture, while reusable bases like embroidery hoops or chalkboard signs can be updated year after year. This approach gives you a festive style that’s as kind to the planet as it is to your home.
Homemade wall decor has the power to turn plain walls into joyful holiday showcases filled with warmth, creativity, and personal memories. Whether you’re crafting alongside your kids, repurposing thrifted treasures, or adding custom touches, every piece tells a story unique to your family.
Start with just one idea today—something small and meaningful—and let it inspire more. Mix your DIY creations with thoughtful accents like our Personalized Winter Wonderland Key Holder or sentimental keepsakes from our First Christmas Together Collection. These pieces bring depth and personality to your holiday look while saving time.
Your walls are more than just surfaces; they’re a canvas for your memories, milestones, and moments of joy. This season, let them tell your story.